Panda Helper iOS
VIP Version Free Version Jailbroken VersionDownload Tweaks and Hacks from Panda Helper
How do you change DNS on iPhone or iPad?
What is DNS?
Today, I’d like to share how to cambiare DNS on iPhone or iPad. And let’s learn what DNS is first.
DNS stands for Domain Name System. It is a system that translates domain names into IP addresses. Every device connecting to the internet is assigned a unique IP address, a string of numbers that identifies the device’s location on the internet. However, IP addresses can be difficult for humans to remember and use. That’s where DNS comes in.
DNS works like a phone book for the internet. When you type a domain name into your web browser, such as “google.com,” your device requests a DNS server to translate that domain name into an IP address. The DNS server looks up the IP address associated with that domain name and sends it back to your device. Your device then uses that IP address to connect to your requested website.
DNS is a critical component of the internet infrastructure. It allows users to access websites and other online resources using easy-to-remember domain names rather than having to remember long strings of numbers. DNS also helps improve internet connections’ speed and efficiency, allowing devices to quickly and easily locate the resources they need on the internet.
How to Cambiare DNS on iPhone
Sometimes you need to change your DNS to make a smooth network on iOS, but you don’t know how to do it. Follow this detailed guide to get it.
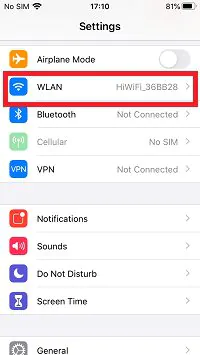
Please connect WIFI and then perform the following steps.
1. Go to Settings and open WLAN or WI-FI.
2. Tap the “i” button, find “Change DNS,” and tap it.

3. Select “Manual” and delete the existing DNS server.

4. Add two DNS servers and tap “Save.”
We use 8.8.8.8 and 114.114.114.114 IP addresses of DNS servers, for example. It is the same method to add other DNS servers you want.

Note: If you want to use the previous DNS server again, go back to “Configure DNS,” select “Automatic,” and tap “Save.” The last DNS server will come back.

The above is the detailed steps of how to cambiare DNS on iPhone.


Latest News
- How do you get the Mighty Party cheats on your devices?
- Bus Simulator Ultimate 2023 guide: review, tips, mod and download
- How do you get Hungry Shark Evolution all sharks in the game?
- How Do You Install AppSync Unified After Jailbreak?
- Geometry Dash Mod APK with speed hack free download on iOS 17 no jailbreak
- How do you change DNS on iPhone or iPad?